建筑结构的准备 - 屋顶建模 - 天窗的创建:修订间差异
| 第57行: | 第57行: | ||
===<IS_TS id=Lukarna/>位于有<IS_TS id=AdditionalStoreyLevel/>的建筑中=== | ===<IS_TS id=Lukarna/>位于有<IS_TS id=AdditionalStoreyLevel/>的建筑中=== | ||
创建此类''<IS_TS id=Lukarna/>'' 的原理与其他情况相同。''<IS_TS id=Lukarna/>'' 可以放置在主楼层的''<IS_TS id=Roof/>'' | 创建此类''<IS_TS id=Lukarna/>'' 的原理与其他情况相同。''<IS_TS id=Lukarna/>'' 可以放置在主楼层的''<IS_TS id=Roof/>'' 上,也可以放置在''<IS_TS id=AdditionalStoreyLevel/>'' 定义的''<IS_TS id=Roof/>'' 上。</br>示范案例:[https://download.instalsoft.com/public/helpsystem/EN/SUF/Preparation-of-building-structure-Roof_modeling-Creation_of_dormers/isproj/7_Dormer_located_in_a_building_with_Additional_storey_level.isproj <IS_TS id=Lukarna/>位于有<IS_TS id=AdditionalStoreyLevel/>的建筑中, isproj]</br>[[File:Dormer additional storey.png |900 px|left|thumb|5. 在<IS_TS id=AdditionalStoreyLevel/>上的 <IS_TS id=Lukarna/>]]<br clear="all"/> | ||
==Additional information== | ==Additional information== | ||
2025年3月29日 (六) 06:17的版本
| 产品 | InstalSystem 5 |
| 文章类型 | 功能和工具 |
| 版本的最新内容 | 2024-11-19 |
说明
本文描述了天窗 建模的方法。它可以使用与创建屋顶 相关的工具去创建,也可以直接使用天窗 进行创建。
天窗 只能插入到现有的屋顶 范围内,天窗 不得伸出屋顶轮廓之外。如有必要,可以为此人为绘制/修改屋顶,或创建建筑的特定部分。
在执行 建筑结构计算 后,天窗 将会与自动生成的垂直墙体一起生成,根据两个图元之间的位置,自动创建特定形状和尺寸的墙体。墙体从上方以天窗屋顶为界,下方以屋顶坡度为界。
在进行 建筑结构计算 后, 天窗 将会插入到没有错误的现有屋顶上。
默认的天窗 将以平面老虎窗插入 - 程序会设置最大坐标(从屋顶平面上的特定点开始),使其默认为水平老虎窗。
在进行 建筑结构计算 后, 天窗 将会插入到没有错误的现有屋顶上。
该程序考虑了所插入的天窗 的房间的立方容量。
所附项目文件为最常见的几种天窗 的创建提供了解决方案。
在程序中的位置
- 进入建筑 编辑器后,在主工具 选项卡的建筑, 屋顶 工具栏上,可以找到屋顶 建模的组件和功能图标。
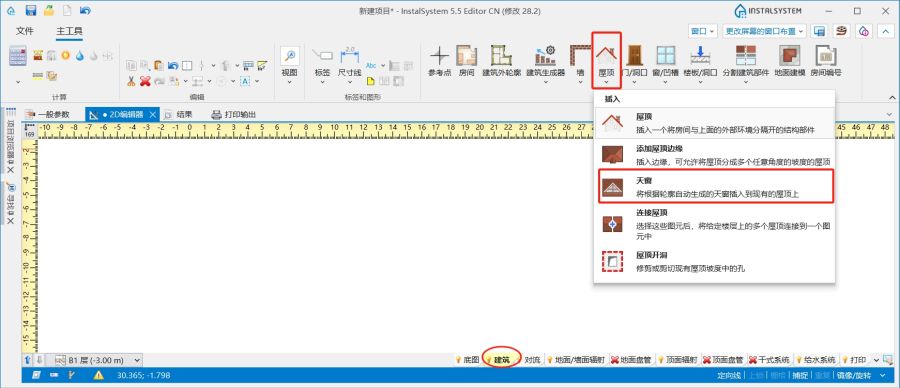
1. 天窗 位置

应用举例
屋顶作天窗
天窗 作为屋顶 的一部分进行建模,使用添加屋顶边缘 功能去创建。更多信息,见: Add roof edge.
对于多层屋顶 需要使用修剪楼板(由屋顶部件)功能。更多信息,见: Trim slab by roof element.
注: 必须特别注意矮墙的正确建模。
示范项目: 屋顶作天窗, isproj

天窗与前墙平齐
天窗 与前墙齐平的建模是一种常见的解决方案:
- 插入天窗;
- 如果必要,使用添加屋顶边缘 功能插入边缘,
- 指定标高或坡度;
- 插入窗。
示范案例: 天窗与前墙平齐, isproj
天窗延伸到建筑轮廓之外
- 使用墙 和 楼板 部件创建延伸到建筑轮廓之外的部分;更多信息,见: 插入墙,插入楼板。
- 屋顶 应完全覆盖建筑的突出部分;
- 将天窗 插入到建筑的突出部分,执行步骤见:天窗与前墙平齐。
示范案例: 天窗延伸到建筑轮廓之外, isproj
天窗覆盖多个房间
操作步骤是: 天窗与前墙平齐 或 天窗延伸到建筑轮廓之外。
示范案例: 天窗覆盖多个房间, isproj

如果一个天窗 覆盖多个房间并且在其最外侧的墙壁之间还有其他物理隔墙,那么这些隔墙不是穿过屋顶本身,而是穿过天窗 的屋顶。
多层天窗延伸至建筑轮廓之外
需要执行的步骤是: 天窗延伸到建筑轮廓之外.
注: 在这种情况下,应使用多层 房间 。更多信息,见: 含有多个楼层的房间.
示范案例: 多层天窗延伸至建筑轮廓之外, isproj

天窗覆盖多楼层房间
天窗位于插入屋顶的楼层下方(多层屋顶)
天窗 可能位于插入屋顶的楼层下方。即使天窗 位于较低楼层,也应将此类天窗 放置在屋顶所在的楼层。
注: 要在同一建筑中创建有错层的楼层,请使用附加楼层。更多信息,见: 创建附加楼层和内部楼层。
可以像屋顶作天窗 或天窗与前墙平齐 那样创建。

天窗位于有附加楼层的建筑中
创建此类天窗 的原理与其他情况相同。天窗 可以放置在主楼层的屋顶 上,也可以放置在附加楼层 定义的屋顶 上。
示范案例:天窗位于有附加楼层的建筑中, isproj

Additional information
- 天窗 has a smaller label than the 屋顶 element, it is distinguished on the 2D plan by dashed red lines and a darker shade of red.
- 天窗 wall has a main longitudinal edge marking (hotpoints at the corners) and always faces the outside of the building - the thickness of the automatically generated dormer walls can only be changed from the inside of the rooms. It is recommended that the thickness of these walls is consistent with the value of the internal vertical walls on which it is based.
- 天窗 relieves the requirement to cut an opening in the roof at the place of its insertion.
- Partitions such as windows, doors or wall openings can be inserted on the dormer walls.
- The user has the option to impose his own value - the thickness for the dormer roof.