导入文件:修订间差异
跳转到导航
跳转到搜索
(创建页面,内容为“==Description== The article describes the functionality of using design underlays (base drawings) by launching underlay import, selecting an external file to be impo...”) |
无编辑摘要 标签:手工回退 |
||
| (未显示4个用户的58个中间版本) | |||
| 第1行: | 第1行: | ||
== | <!--Case 134854, W8821--> | ||
<IS_HELP id="HS67"/> | |||
{{Article table | |||
* '''DWG''' | |commercial_product1=InstalSystem 5 | ||
* ''' | |p2 =<!--gdy jest kolejny produkt handlowy, zamienić na->"produkt_handlowy2="--> | ||
* ''' | |p3 =<!--gdy jest kolejny produkt handlowy, zamienić na->"produkt_handlowy3="--> | ||
* ''' | |p4 =<!--gdy jest kolejny produkt handlowy, zamienić na->"produkt_handlowy3="--> | ||
* ''' | |category1 =InstalSystem 5#Functionalities | ||
* ''' | |category_name1 =功能 | ||
* ''' | |c2 =<!--Jest kategoria -> zamienić na: "category2=" i uzupełnić link do sekcji kategorii na stronie głównej produktu--> | ||
== | |category_name2 =<!--podać nazwę kategorii "ZASTOSOWANIE"/"FUNKCJONALNOŚĆ"/...--> | ||
* | |c3 =<!--Jest kategoria -> zamienić na: "category3=" i uzupełnić link do sekcji kategorii na stronie głównej produktu--> | ||
== | |category_name3 =<!--podać nazwę kategorii "ZASTOSOWANIE"/"FUNKCJONALNOŚĆ"/...--> | ||
=== | |version1 =[[Release notes InstalSystem 5#Version BETA 34 Rev. 0.0.B34|IS 5.0 Beta 34]] | ||
# | |v2 =<!--Jest wersja -> zamienić na: "version2=" i uzupełnić link do sekcji RN danego produktu--> | ||
# | |v3 =<!--Jest wersja -> zamienić na: "version2=" i uzupełnić link do sekcji RN danego produktu--> | ||
# | |v4 =<!--Jest wersja -> zamienić na: "version2=" i uzupełnić link do sekcji RN danego produktu--> | ||
# | }} | ||
# | ==说明== | ||
# | 本文介绍了使用设计底图(基本图形)的功能,既通过使用导入底图的工具,选择一要导入的外部文件,插入到项目中,然后选择适当的比例和将其定位的方法。<br/> | ||
== | 可导入的底图文件格式: | ||
# | * 矢量格式 | ||
# | *:- '''DWG''' | ||
# | *:- '''DXF''' | ||
* 栅格格式 | |||
*:- '''PDF''' | |||
*:- '''BMP''' | |||
*:- '''PNG''' | |||
*:- '''JPG''' | |||
*:- '''GIF''' | |||
==程序中的位置== | |||
* 当在''2D编辑器'' 窗口中,开启''<IS_TS id=lystrGraphicBackground/>'' 编辑范围时,就可在''<IS_TS id=NarzedziaGlowne/>'' 的''<IS_TS id=lystrGraphicBackground/>'' 工具栏中发现与导入底图相关的所有功能和图标。<br/>[[File:导入底图.png|900 px|left|thumb|1. 导入底图]]<br clear="all"/> | |||
==应用举例== | |||
===导入底图=== | |||
# 选择 ''<IS_TS id=btImportujPodkladZPlikuDXF/>'' | |||
# 选择要导入的底图文件 | |||
# 指出底图在''<IS_TS id=lystrGraphicBackground/>'' 编辑范围中的位置 | |||
# 选择并确认正确的底图尺寸。<br/>在参数表中可修改底图的尺寸或使用''<IS_TS id=strTabSkalowanieCaption/>'' 工具修改底图的尺寸,它需要绘制一条辅助线段并给出它的实际长度来确定图纸的尺寸。此外,如果导入的是DWF/DXF文件,就可在参数表中选择CAD单位与米的倍数或分倍数之间的转换因子来确定底图的尺寸。 | |||
# 检查底图保存的位置选项<br/>底图可保存在项目文件*.ISPROJ中,在此情况下,文件的尺寸就会变大(在多个工作表中放置的同一底图文件并不会因底图的使用次数成比例的增加);或也可将其保持在另一(原始的)文件中,供项目文件来参考。后者的解决方案需要当项目文件转交他人时,底图文件也需同时转交,并指定它在计算机中的访问路径。 | |||
# 检查每一楼层中多个底图对齐的位置。为了获得正确的多层建筑结构,建议使用''<IS_TS id=iNameReferencePoint/>'' [[File:Reference-point.png|40 px|]]。这就需在每一工作表(楼层)上,在具有相同X、Y坐标位置的点处放置上下对齐的参考点。<br/> <br/>{{#ev:youku|id_XMjY1NzY2MDkzMg|900||||rel=0}} <br clear="all"/> | |||
==其它说明== | |||
# 如果导入的是'''DWG''' 格式的文件作为底图,其最大的优点就是当编辑建筑结构时,可利用自动捕捉功能,将鼠标吸引到底图图层上的建筑部件上。 | |||
# 如果有必要,也可以限制(减小)底图可见的区域,如在一个图纸里包含了几个楼层的平面图。限制可见区域的操作也可在项目设计过程中随时取消。<br/>{{#ev:youku|id_XMjY1NzY2MTgzMg|900||||rel=0}} <br clear="all"/> | |||
# 如果底图被分成了几个部分(如,一张大图不能一次扫描完成,需分几次才能扫描完全部内容),这些底图就需分别导入,然后使用[[拼接图片文件]]功能将它们再按顺序拼接起来。 | |||
[[Category:InstalSystem 5]] | [[Category:InstalSystem 5]] | ||
[[Category: | [[Category:功能]] | ||
[[it:Importazione dei file]] | |||
[[ | <!-- Do not write text below this tag --> | ||
[[lt:Bylų importavimas]] | <br class="iwlinks"/>[[pl:Import plików podkładów|Import plików podkładów]][[en:Import underlay files|Import underlay files]][[it:Importazione dei file|Importazione dei file]][[bg:Внос на файлове|Внос на файлове]][[lt:Bylų importavimas|Bylų importavimas]] | ||
2026年9月4日 (五) 23:13的最新版本
| 产品 | InstalSystem 5 |
| 文章类型 | 功能 |
| 版本的最新内容 | IS 5.0 Beta 34 |
说明
本文介绍了使用设计底图(基本图形)的功能,既通过使用导入底图的工具,选择一要导入的外部文件,插入到项目中,然后选择适当的比例和将其定位的方法。
可导入的底图文件格式:
- 矢量格式
- - DWG
- - DXF
- 栅格格式
- - BMP
- - PNG
- - JPG
- - GIF
程序中的位置
- 当在2D编辑器 窗口中,开启底图 编辑范围时,就可在主工具 的底图 工具栏中发现与导入底图相关的所有功能和图标。
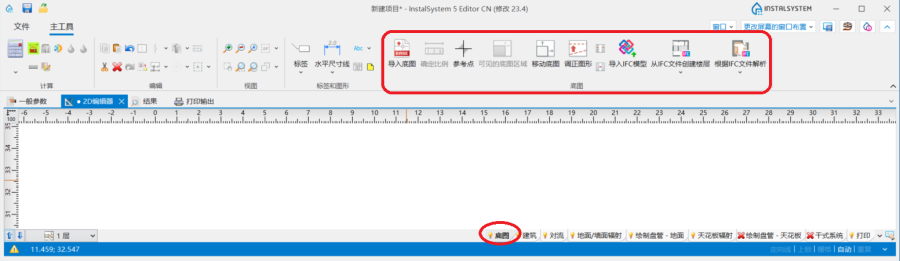
1. 导入底图

应用举例
导入底图
- 选择 导入底图
- 选择要导入的底图文件
- 指出底图在底图 编辑范围中的位置
- 选择并确认正确的底图尺寸。
在参数表中可修改底图的尺寸或使用确定比例 工具修改底图的尺寸,它需要绘制一条辅助线段并给出它的实际长度来确定图纸的尺寸。此外,如果导入的是DWF/DXF文件,就可在参数表中选择CAD单位与米的倍数或分倍数之间的转换因子来确定底图的尺寸。 - 检查底图保存的位置选项
底图可保存在项目文件*.ISPROJ中,在此情况下,文件的尺寸就会变大(在多个工作表中放置的同一底图文件并不会因底图的使用次数成比例的增加);或也可将其保持在另一(原始的)文件中,供项目文件来参考。后者的解决方案需要当项目文件转交他人时,底图文件也需同时转交,并指定它在计算机中的访问路径。 - 检查每一楼层中多个底图对齐的位置。为了获得正确的多层建筑结构,建议使用参考点
 。这就需在每一工作表(楼层)上,在具有相同X、Y坐标位置的点处放置上下对齐的参考点。

其它说明
- 如果导入的是DWG 格式的文件作为底图,其最大的优点就是当编辑建筑结构时,可利用自动捕捉功能,将鼠标吸引到底图图层上的建筑部件上。
- 如果有必要,也可以限制(减小)底图可见的区域,如在一个图纸里包含了几个楼层的平面图。限制可见区域的操作也可在项目设计过程中随时取消。
- 如果底图被分成了几个部分(如,一张大图不能一次扫描完成,需分几次才能扫描完全部内容),这些底图就需分别导入,然后使用拼接图片文件功能将它们再按顺序拼接起来。